(Created page with "以下の手順に従って、メッセージを作成してください:") |
(Created page with "#メッセージの内容を用意します。 #ヘッドセットを付けます。 #'''設定''' 26pxをクリックします。ユーザポロ...") |
||
| Line 13: | Line 13: | ||
以下の手順に従って、メッセージを作成してください: | 以下の手順に従って、メッセージを作成してください: | ||
| − | # | + | #メッセージの内容を用意します。 |
| − | # | + | #ヘッドセットを付けます。 |
| − | # | + | #'''設定''' [[File:Settings-Icon-50.png|26px]]をクリックします。ユーザポロファイル写真がアップロードされている場合、この写真は、設定アイコンとして使用されます。 |
| − | # | + | #'''録音されたメッセージ'''を選択します。 |
| − | # | + | #表示されるダイアログウィンドウの“'''+'''” ボタンをクリックします。 |
| − | # | + | #表示されるウィンドウでは, メッセージの'''タイトル''' (例えば、 ''通常のボイスメールメッセージ'')をクリックします。 |
| − | # | + | #'''録音開始'''ボタン[[File:Record-Button-50.png|26px]]をクリックします。一回切りの着信音が鳴り、録音が開始されます。ボタンの表示は'''停止'''コントロールキーに切り替わります [[File:Stop-Recording-Button.png|26px]]. |
| − | # | + | # マイクに向かってメッセージを言います。メッセージが終わると、'''録音停止'''ボタン [[File:agent-guide-image18.JPG|26px]]をクリックします。 |
| − | # | + | #メッセージの内容を確認するには、'''ファイル再生'''ボタン [[File:Play-File-Button.png]]をクリックします。メッセージの録音をやり直したい場合、上記の6 と 7 ステップを再度やり直します。 |
| − | # | + | # '''Ok'''ボタンをクリックし確定します。 |
Revision as of 14:26, 9 September 2018
録音されたメッセージの使用方法
コンタクトセンターの慣行及びご提供のサービス内容に応じて、コール1件1件ごとに同じ情報をお客様に伝えなければならない場合があります (例えば、標準的な挨拶や注意事項など)。このようなスタンダードなメッセージは事前に録音しておくと、お客様との津輪中に再生することができます
録音されたメッセージの一部は、コンタクトセンターによる提供される様々なサービスを対象に、システム管理者が再設定することができます。この場合、特定のサービスに関連するコールを処理すると、このサービス専用に再設定されたメッセージが「コンタクト先情報パネル」で選択できるようになります。
メッセージの作成
メッセージ内容をご自身で決め、ご自身の声で録音することができます。
以下の手順に従って、メッセージを作成してください:
- メッセージの内容を用意します。
- ヘッドセットを付けます。
- 設定
 をクリックします。ユーザポロファイル写真がアップロードされている場合、この写真は、設定アイコンとして使用されます。
 - 録音されたメッセージを選択します。
- 表示されるダイアログウィンドウの“+” ボタンをクリックします。
- 表示されるウィンドウでは, メッセージのタイトル (例えば、 通常のボイスメールメッセージ)をクリックします。
- 録音開始ボタン
 をクリックします。一回切りの着信音が鳴り、録音が開始されます。ボタンの表示は停止コントロールキーに切り替わります
  .
. - マイクに向かってメッセージを言います。メッセージが終わると、録音停止ボタン
をクリックします。
- メッセージの内容を確認するには、ファイル再生ボタン
 をクリックします。メッセージの録音をやり直したい場合、上記の6 と 7 ステップを再度やり直します。
 - Okボタンをクリックし確定します。
Standard Greetings
You can designate one of your prerecorded messages as a standard greeting that will be played to customers automatically as soon as you answer their calls (e.g., Welcome to ... My name is ... How can help you today?). You should only use such an automatic greeting if you actually use the same way of greeting your customers on all service calls that you handle.
To create such a greeting, follow these steps:
- When reviewing your message, select the play automatically on all service calls checkbox.
- When you click Ok to confirm, the message will appear marked as (default) in the message list.
Reviewing and Editing Messages
You can review your messages, change their titles, and re-record the content whenever you like.
To review and/or edit an existing prerecorded message, follow these steps:
- Navigate to Settings > Pre-recorded Messages
- Select the message you wish to edit
- Click the edit button
 .
.
Note: Instead of recording your personal messages via the Agent Desktop application, you can record them offline and store them as audio files. The process of configuring your greetings is the same, except instead of recording controls, you click the Upload button and select the desired audio file.
Playing Messages During a Call
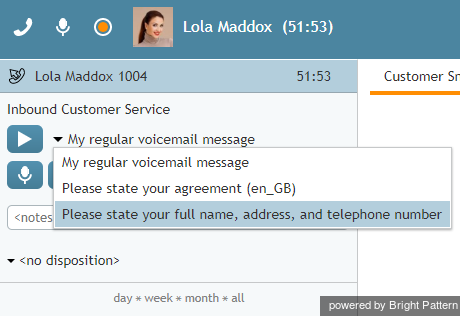
If there are any prerecorded messages defined either at the service level or for your personal use, a message selector will appear in the Contact Info Panel when you have a connected call.
To play a message to the other party on the call, follow these steps:
- Select the desired message from the drop-down menu. If you do not see the desired message in the drop-down menu, click more… A separate dialog window will appear listing all available messages in two groups: Canned Prompts from Service and Personal Pre-recorded Messages.
- Click the Play file button
 .
. - Playback of the selected message will begin. You will be able to hear the message being played. You can continue the conversation with the other party normally after the message playback ends.
- If you wish to stop the message before the end of the playback, click the Stop button. You can continue the conversation with the other party normally after stopping the message.
Using a Pre-recorded Message As a Voicemail
You can use the message playback function to leave a prerecorded message on the called party’s answering machine. In this case, you can disconnect yourself from the call immediately after activating the message playback.
To leave a prerecorded message on the other party’s answering machine, follow these steps:
- Select the desired message as described, and wait for the invitation to leave a message.
- Click the Play file button
 . Playback of the selected message will begin.
 - Click End Call at any time to disconnect yourself from the call.
Playback of the prerecorded message to the called party’s answering machine will continue until the message ends and the call will then be disconnected automatically.


