(Created page with "5.2:コンタクトセンター管理者ガイド/チャット") |
|||
| (21 intermediate revisions by the same user not shown) | |||
| Line 1: | Line 1: | ||
| − | = | + | = チャット = |
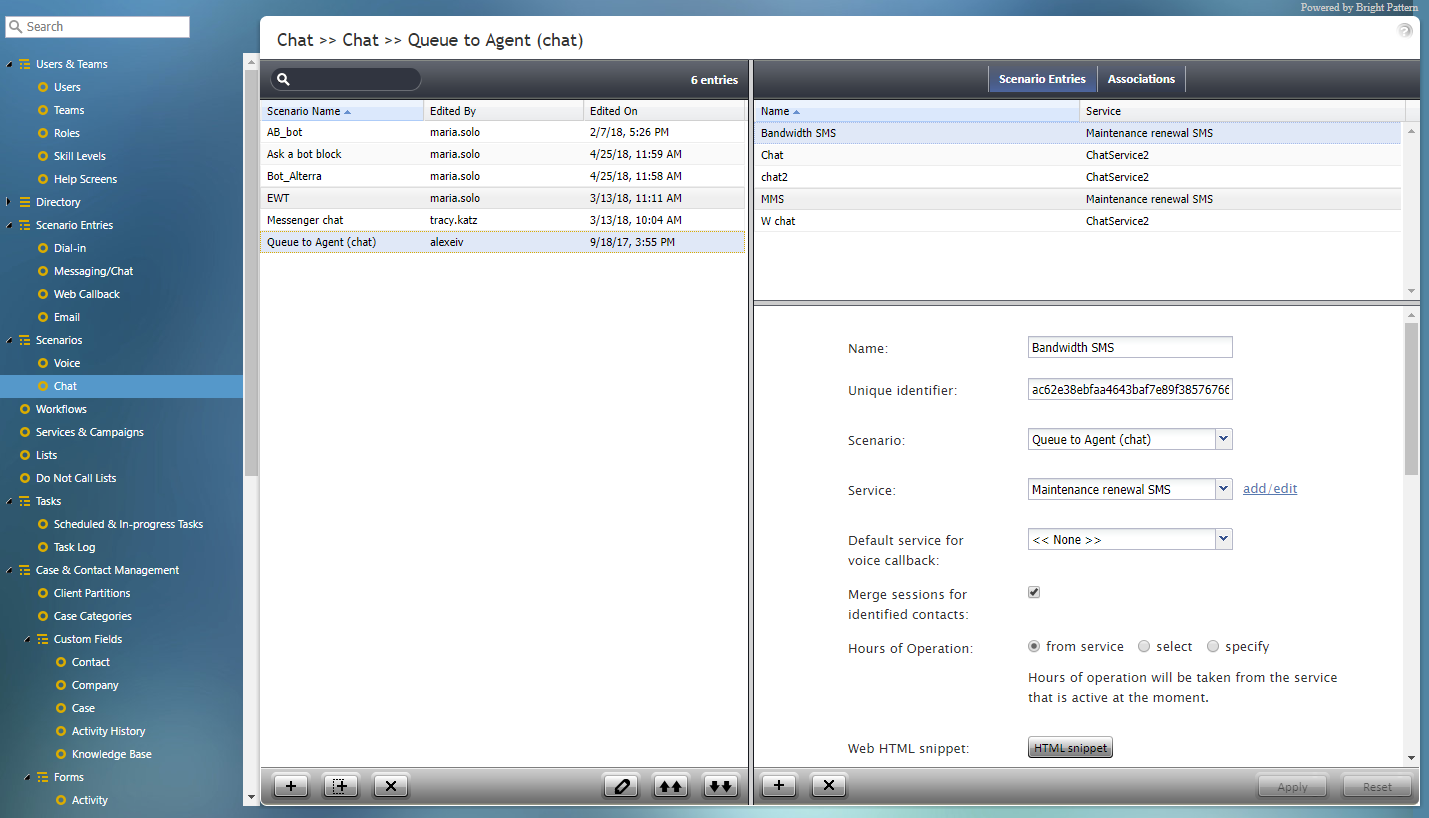
| − | + | チャットシナリオを作成または編集するには、 ''シナリオ''メニューより'''チャット'''オプションを選択します。この操作は、 [http://www.brightpattern.com/zendesk-chat/ Zendeskライブチャット]および Salesforce.com チャット統合を対象とします。'''チャット'''を選択すると、画面は次のように更新されます。 | |
| − | [[File:Scenarios-Chat-Overview-50.PNG|800px|center| | + | [[File:Scenarios-Chat-Overview-50.PNG|800px|center|シナリオ > > チャット]] |
| − | + | '''シナリオ >チャット'''の右側のペインを使って、チャットシナリオとウェブページとの関連付けを管理(つまり、チャットシナリオエントリーの作成と編集)できます。 | |
| − | + | '''チャット'''の画面プロパティは、'''シナリオエントリー'''と'''関連付け'''という2つのタブで構成されています。 各タブのプロパティは以下の通りです。 | |
| − | == | + | === シナリオエントリータブ === |
| − | === | + | ==== メッセージ送信/チャットシナリオエントリーのリスト ==== |
| − | + | このリストは、選択されたシナリオが使われる [[contact-center-administrator-guide/Messaging|メッセージ送信/チャットシナリオエントリー]]リストです。 | |
| − | === | + | === メッセージ送信/チャットシナリオエントリープロパティ === |
| − | + | これらは、''メッセージ送信/チャットシナリオエントリーのリスト''.で選ばれたメッセージ送信/チャットシナリオエントリーのプロパティです。プロパティに関する詳しい情報は、 [[contact-center-administrator-guide/Messaging|メッセージ送信/チャット]]をご覧ください。 | |
| − | + | ここで、プロパティの編集または新しいエントリーの設定が可能です。 | |
| − | == | + | === 関連付けタブ === |
| − | === | + | ==== 関連付けのリスト ==== |
| − | '' | + | ''関連付けのリスト'' には、スキルやサービスなど、このシナリオに関連する全てのコンタクトリソースが含まれます。このリストは、例えば、一つのシナリオが異なる場面(開発、ステージング、作成)で使われる場合に便利です。 |
| − | = | + | == チャットシナリオテンプレート == |
| − | + | テンプレートを使うことによって、チャットシナリオを簡単に作成できます。 | |
| − | + | 以下のシナリオでは、'''モバイルチャット'''のテンプレートは、チャットシナリオの開発をサポートするために使用されます。 | |
| − | + | モバイルチャットシナリオは、Webチャットまたはモバイルチャットのいずれかに使用できます。このシナリオは、お客様がコンタクトセンターとのチャットの対話をリクエストしたときに開始されます。 このシナリオはウェブフォームを介してお客様のデータを要求し、該当する資格を持つエージェントへ接続します。チャットセッションが終了する直前に、シナリオはお客様に対してアンケートフォームのトランスクリプトを送信します。 | |
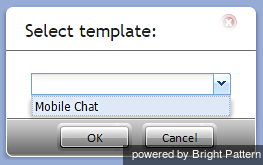
| − | + | テンプレートを使用するには、画面の下にある '''テンプレートから追加'''アイコン[[ File:Add-From-Template-Icon.png | 26px |テンプレートアイコンから追加]]をクリックします。表示されるポップアップウィンドウで、ご希望のテンプレートを選択します。 '''OK '''をクリックします。この例では、選択したテンプレートは"モバイルチャット"です。 | |
| − | [[File:Select-template-window.png|250px|center| | + | [[File:Select-template-window.png|250px|center|テンプレートポップアップウィンドウを選択します]] |
| − | + | '''OK'''をクリックすると、シナリオビルダーアプリケーションが新しいブラウザウィンドウまたはタブ(設定による)で起動します。 | |
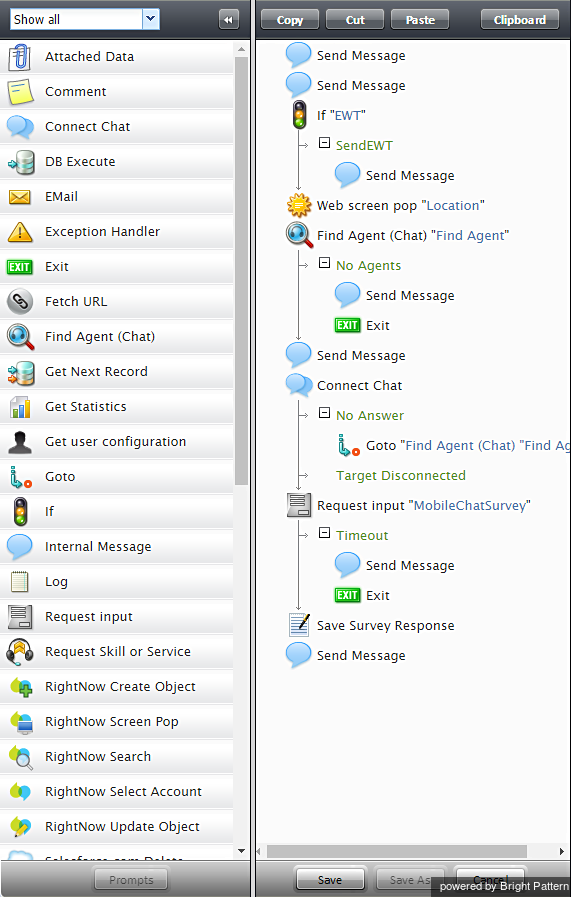
| − | + | シナリオビルダーは、シナリオ内の一連のアクションをカスタマイズできるとても便利な方法を提供します。このアプリケーションでは、テンプレートの表示、ワークフローに合わせてビルディングブロック(プロンプト)のカスタマイズができます。シナリオビルダーは、画面の左側のパネルにあるリストで、利用可能な全てのビルディングブロック(例えば、''エージェントの検索''、''メッセージの送信''、''チャットの接続''など)を表示します。これらのブロックは、お客様との対話中に発生する可能性のあるアクションを表示し、左側の''プロンプト''リストから右側のシナリオパネルにドラッグアンドドロップされます。ブロックを削除するには、当該のブロックを左側の'''プロンプト'''リストにドラッグします。 | |
| − | [[File:Scenario-Builder.png|500px|center| | + | [[File:Scenario-Builder.png|500px|center|テンプレートからのシナリオビルダー]] |
| − | + | シナリオブロックおよびその使用方法に関する詳しい情報は、 [[3.13:scenario-builder-reference-guide/ScenarioBuilderOverview|シナリオビルダー概要リファレンスガイド]] をご覧ください。 | |
Latest revision as of 16:58, 1 December 2018
チャット
チャットシナリオを作成または編集するには、 シナリオメニューよりチャットオプションを選択します。この操作は、 Zendeskライブチャットおよび Salesforce.com チャット統合を対象とします。チャットを選択すると、画面は次のように更新されます。
シナリオ >チャットの右側のペインを使って、チャットシナリオとウェブページとの関連付けを管理(つまり、チャットシナリオエントリーの作成と編集)できます。
チャットの画面プロパティは、シナリオエントリーと関連付けという2つのタブで構成されています。 各タブのプロパティは以下の通りです。
シナリオエントリータブ
メッセージ送信/チャットシナリオエントリーのリスト
このリストは、選択されたシナリオが使われる メッセージ送信/チャットシナリオエントリーリストです。
メッセージ送信/チャットシナリオエントリープロパティ
これらは、メッセージ送信/チャットシナリオエントリーのリスト.で選ばれたメッセージ送信/チャットシナリオエントリーのプロパティです。プロパティに関する詳しい情報は、 メッセージ送信/チャットをご覧ください。
ここで、プロパティの編集または新しいエントリーの設定が可能です。
関連付けタブ
関連付けのリスト
関連付けのリスト には、スキルやサービスなど、このシナリオに関連する全てのコンタクトリソースが含まれます。このリストは、例えば、一つのシナリオが異なる場面(開発、ステージング、作成)で使われる場合に便利です。
チャットシナリオテンプレート
テンプレートを使うことによって、チャットシナリオを簡単に作成できます。
以下のシナリオでは、モバイルチャットのテンプレートは、チャットシナリオの開発をサポートするために使用されます。
モバイルチャットシナリオは、Webチャットまたはモバイルチャットのいずれかに使用できます。このシナリオは、お客様がコンタクトセンターとのチャットの対話をリクエストしたときに開始されます。 このシナリオはウェブフォームを介してお客様のデータを要求し、該当する資格を持つエージェントへ接続します。チャットセッションが終了する直前に、シナリオはお客様に対してアンケートフォームのトランスクリプトを送信します。
テンプレートを使用するには、画面の下にある テンプレートから追加アイコン![]() をクリックします。表示されるポップアップウィンドウで、ご希望のテンプレートを選択します。 OK をクリックします。この例では、選択したテンプレートは"モバイルチャット"です。
をクリックします。表示されるポップアップウィンドウで、ご希望のテンプレートを選択します。 OK をクリックします。この例では、選択したテンプレートは"モバイルチャット"です。
OKをクリックすると、シナリオビルダーアプリケーションが新しいブラウザウィンドウまたはタブ(設定による)で起動します。
シナリオビルダーは、シナリオ内の一連のアクションをカスタマイズできるとても便利な方法を提供します。このアプリケーションでは、テンプレートの表示、ワークフローに合わせてビルディングブロック(プロンプト)のカスタマイズができます。シナリオビルダーは、画面の左側のパネルにあるリストで、利用可能な全てのビルディングブロック(例えば、エージェントの検索、メッセージの送信、チャットの接続など)を表示します。これらのブロックは、お客様との対話中に発生する可能性のあるアクションを表示し、左側のプロンプトリストから右側のシナリオパネルにドラッグアンドドロップされます。ブロックを削除するには、当該のブロックを左側のプロンプトリストにドラッグします。
シナリオブロックおよびその使用方法に関する詳しい情報は、 シナリオビルダー概要リファレンスガイド をご覧ください。


