メッセージ送信/チャット
メッセージ送信/チャットシナリオエントリーは、モバイルおよびウェブアプリケーションを使って シナリオをコンタクトに関連付けるのに使用されます。
これらの関連付けを設定・管理するには、 シナリオエントリー メニューよりメッセージ送信/チャット というオプションを選択します。

メッセージ送信/チャットシナリオエントリーの画面プロパティ
メッセージ送信/チャットシナリオエントリーの画面プロパティは以下の通りです。
名前
名前とは、メッセージ送信/チャットシナリオエントリーの名前を意味します。このフィールドは入力必須であり、コンタクトセンターにおいて一意でなければなりません。
ユニークなID
ユニークなIDは、システムによってシナリオエントリー用に生成されます。このIDは、モバイルとウェブアプリケーションでアプリケーションIDとして使用されます。アプリケーションIDを使うことによって、シナリオエントリーを介してコンタクトセンターへの接続が可能です。詳しい情報は、Bright Pattern モバイル/ウェブAPI仕様の一般情報 をご覧ください。
シナリオ
シナリオとは、エントリーポイントを介して受信されるチャットの処理を行う チャットシナリオを意味します。
サービス
シナリオエントリーに関連するサービスのことです。サービスの入力は任意です。詳しい情報は、ダイヤルインシナリオエントリーに関する説明をご覧ください。
音声コールバックの既定サービス
お客様がモバイルまたはウェブチャット中に音声コールバックを要求する場合、音声サービスを選択します。音声コールバックの既定サービスのドロップダウンメニューには、サービスおよびキャンペーンに追加された音声サービスが含まれます。
営業時間
営業時間 (HOP)は、シナリオエントリーポイントのスケジュールに基きます。このフィールドはオプションです。詳しい情報については、ダイヤルインシナリオエントリーをご覧ください。
Web HTMLスニペット
Web HTMLスニペットは、お客様が指定されたシナリオエントリーを介してコンタクトセンターにアクセスするための チャットアプリケーションのウェブエレメントへのアクセスを提供します。
サービスプロバイダーが提供するチャットアプリケーションをそのまま利用できるし、オリジナルアプリケーションも作成できます。
プロバイダーが提供するアプリケーションを使うには、HTMLスニペットボタンをクリックし、HTMLスニペットコードを コピーし、ウェブページに貼り付けます。通常、サービスプロバイダーから指示がない限り、既定のクライアントwebサーバーホスト名を変更する必要はありません。
アプリケーションを作成するには、クライアントアプリケーションボタンをクリックします。既存のアプリケーション(上記参照)のコードを含むZipファイルがパソコンにダウンロードされます。貴社のウェブサイトに合わせるようにこのコードを変更し 、モバイル/ウェブAPIを使って必要なアプリケーション機能を追加します。
必要なスキル
必要なスキルとは、特定のシナリオエントリーを介して受信されるコールを処理するためにエージェントが付与される補助スキルを意味します。このフィールドの入力は任意です。詳しい情報は、ダイヤルインのシナリオエントリーをご覧ください。
予測されるパラメータ
予測されるパラメータとは、モバイルアプリケーションから受信されるセッションリクエストのシナリオで予測されるパラメータ(例えば、お客様の名前)を意味します。このようなパラメータはオプションです。それらは、例えば、要求されたチャットセッションを処理するために最も相応しいエージェントの選択、エージェントに対してユーザ情報の表示に使用できます。詳しい情報は、モバイル/ウェブ API 仕様の予測されるパラメータをご覧ください。
新しいパラメータを設定するには、追加をクリックし、パラメータタイプを選択し、名前を指定します。既存のパラメータを編集または削除するには、そのパラメータの名前にカーソルを合わせます。
SMS/MMSアクセス番号
Bright Pattern コンタクトセンターでは、お客様はSMSやマルチメディアメッセージングサービス(MMS)を使用してチャットの会話をリクエスト・実行することができます。このようなチャットリクエストは最初、専用のアクセス番号へ受信されます。ルーティング、エージェントデスクトップ、およびレポートを含むリクエストのそれ以降の処理プロセスは、通常のチャットセッションの処理と変わりません。
この設定を使って、お客様が上記のようなSMS / MMSチャットを開始するための専用番号を指定します。この番号は、サービスプロバイダによって割り当てられ、SMS / MMS通信専用の有効なアクセス番号でなければなりません (アクセス番号リストに[番号]/SMS/MMS という形式で表示されるアクセス番号)。
1つのシナリオエントリーに複数のアクセス番号を割り当てることはできますが、1つの番号を複数のエントリーに割り当てることはできません。
メッセンジャーアカウント
エージェントは、お客様のメッセンジャーアカウント(Facebook Messenger、LINE、Telegram、Viberなど)を使って開始されたライブチャットに参加することができます。貴社のコールセンター用に設定されているメッセンジャーと統合するアカウントは、メッセンジャーアカウントのドロップダウンメニューから選択できます。メッセージング/チャットのシナリオエントリーにメッセンジャーアカウントを追加するには、 追加 をクリックしてご希望のアカウントを選択します。
ボット/ チャットのサジェスト機能エンジン
当社のシステムはチャットボットと統合し、チャットセッション中にエージェントに有意義な提案を提供するだけでなく、お客様がエージェントからのサポートがなくてもセルフサービスタスクを実行できるためのボット機能も提供します。 ボット/ チャットのサジェスト機能エンジンのドロップダウンメニューより、サービスごとのサジェストエンジンとして、ボット/ チャットのサジェスト機能エンジンの統合アカウントを選択できます。このような統合アカウントの1つは、チャット起動ポイントでのチャットボットとして選択することができます。初期設定では、エンジンはなしとなっています。
電話の自動接続
全てのモバイルアプリケーションのコンタクトは最初にチャットリクエストとして表示されます。しかし、モバイルアプリケーションでお客様の携帯電話番号が送信された場合、この番号はエージェントデスクトップに表示され、エージェントはそれを使って電話をかけ、お客様と音声通話を行うことができます。電話の自動接続のチェックボックスを選択すると、電話番号が受信される場合音声通話が自動的に開始されます。
接続するまでの時間
電話の自動接続というオプションを選択すると、お客様の携帯電話番号への自動呼び出しが開始されるまでの時間を設定できます。エージェントが元のリクエストに含まれた情報を確認する時間が必要な場合など、このオプションが便利です。
Queuing priority
Queuing priority is the priority of interactions arriving through this scenario entry. This field is optional. See the corresponding description for the Dial-in scenario entries for more information.
Chat nick for system messages
Chat nick for system messages is the name that will be displayed to the customers when they get automated chat responses through this scenario entry (e.g., during an initial data collection stage). By default, this is the name of your contact center (tenant name) that is defined at the service provider level.
How long an agent could wait for reply before chat times out
This is the amount of time (in minutes) that an agent could wait for a reply before the chat interaction expires. It can be redefined for each Messaging/Chat scenario entry separately.
This setting overrides the Customer Inactivity Timeout setting.
How long a client browser may stay unresponsive before chat times out
This is the amount of time (in minutes) that the client's browser may stay unresponsive before the chat interaction expires.
Visible to agents
Visible to agents indicates whether this scenario entry shall appear in the Agent Desktop directory. See the corresponding description for the Dial-in scenario entries for more information.
Directory folder
Directory folder is the folder of the Agent Desktop directory where this scenario entry will appear if enabled by the previous option. See the corresponding description for the Dial-in scenario entries for more information.
Scenario parameters
Scenario parameters are optional. See the corresponding description for the Dial-in scenario entries for more information.
Chat session icon
The chat session icon appears in the customer-facing chat window during active chat sessions. You have the option of uploading an icon (e.g., logo, photo, etc.) on a system-wide level, which will be seen in chat windows for all customers interacting with agents in your tenant. If uploaded, this icon overrides photos that agents have uploaded to their User Profile in the Agent Desktop application, which are normally seen by customers in their active chat windows.
Leaving this field empty or removing a chat session icon allows chat windows to display the photo that an agent has uploaded to his or her User Profile (if available).
For example, agent Christy Borden has uploaded a photo to her User Profile, as shown. The agent's uploaded photo appears in the customer's active chat window.

Uploading a chat session icon causes the agent's photo in the chat window to be replaced by the icon that you uploaded. Note that you must click Apply to save your changes. Also note that the chat session icon that you upload does not override agents' User Profile photos--only the display photos shown in active chat windows.
In all new chat interactions, the customer's chat window will display the chat session icon that you have uploaded. In addition, web notifications that pop on agent replies when the visitor's browser window with chat is minimized, or overlapped by other windows, will also contain the chat session icon for all agents.
Co-browsing
During a web chat, co-browsing functionality allows the agent to view the customer’s screen and follow the customer’s scrolling movements. Co-browsing is initiated during the chat by the customer--not the agent--and screen sharing ends when either the customer clicks the Co-browsing ![]() button or when the chat is terminated.
button or when the chat is terminated.
Co-browsing is configured in the code (see section HTML Snippet above) of the chat application that customers will use to access your contact center. To allow and configure co-browsing for your web chats, you must have system access to either your tenant’s HTML snippet code and/or your organization’s web page itself.
How to Enable Co-browsing
- In Contact Center Administrator, navigate to Scenario Entries > Messaging/Chat.
- Select the desired chat scenario entry.
- In the Properties pane, click the HTML snippet button, and copy all of the code to your clipboard.
- Paste the copied HTML into a text editing application (e.g., Notepad++) to edit it.
- In the HTML, make two changes:
- Insert a comma AFTER chatPath: 'https://five.brightpattern.com/clientweb/chat-client-v4/'
- Hit Return and insert the following: togetherJS_enabled : true,
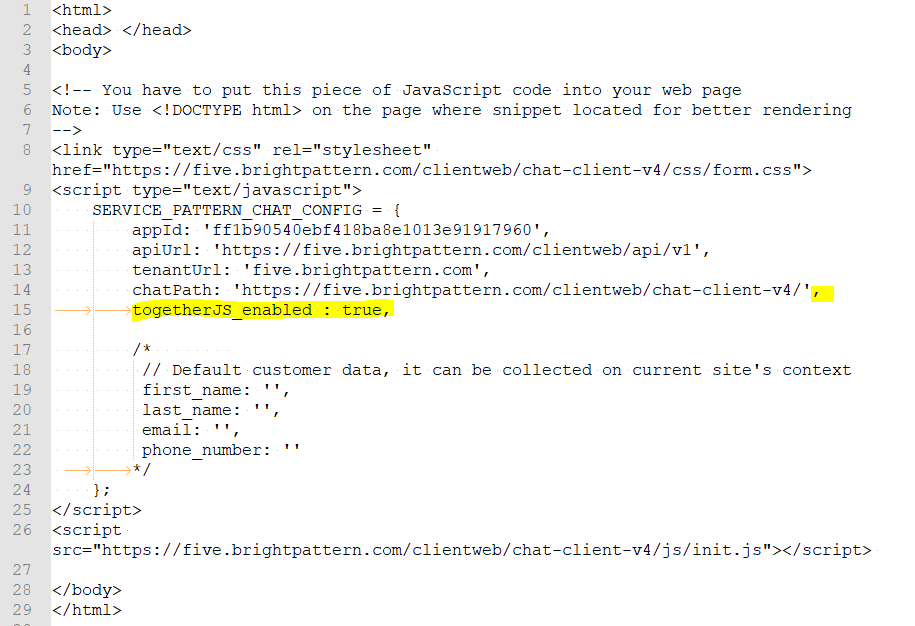
- Insert a comma AFTER chatPath: 'https://five.brightpattern.com/clientweb/chat-client-v4/'
- Copy all and paste the edited HTML onto your web page. This embeds the chat application into your webpage.
- Publish the webpage and refresh any active chats.


How Co-browsing Works
This additional code (togetherJS_enabled : true,) causes the chat application to display the Co-browsing ![]() button to customers during active chats. When the customer clicks the Co-browsing button, a request is sent to the agent in the chat message.
button to customers during active chats. When the customer clicks the Co-browsing button, a request is sent to the agent in the chat message.

When the agent accepts the request, the customer’s screen appears on the agent’s screen. The agent can follow the customer’s scrolling movements and view the customer’s screen only.
A hand icon, along with the label “Viewer”, is displayed on the customer’s screen to indicate that an agent is currently viewing the screen in Co-browsing mode. Similarly, the agent will see a circle icon that indicates the agent is viewing the customer’s screen.

Co-browsing is turned off when the customer clicks the Co-browsing ![]() button again on the active chat window.
button again on the active chat window.
Chat widget
The chat widget provides access to the web elements of the chat application that customers will use to access your contact center via the given scenario entry. The chat widget may be customized for color, size, fonts, font size, display elements, and more.
To edit the chat widget, click customize. The Chat Widget Configuration window will open. For more information, see the Chat Widget Configuration Guide.